|
|
|
Baffles for Maccann Duet Concertinas:
|
|
|
|
|
Posted 15 February 2002 Baffles for Maccann Duet Concertinas:
|
|
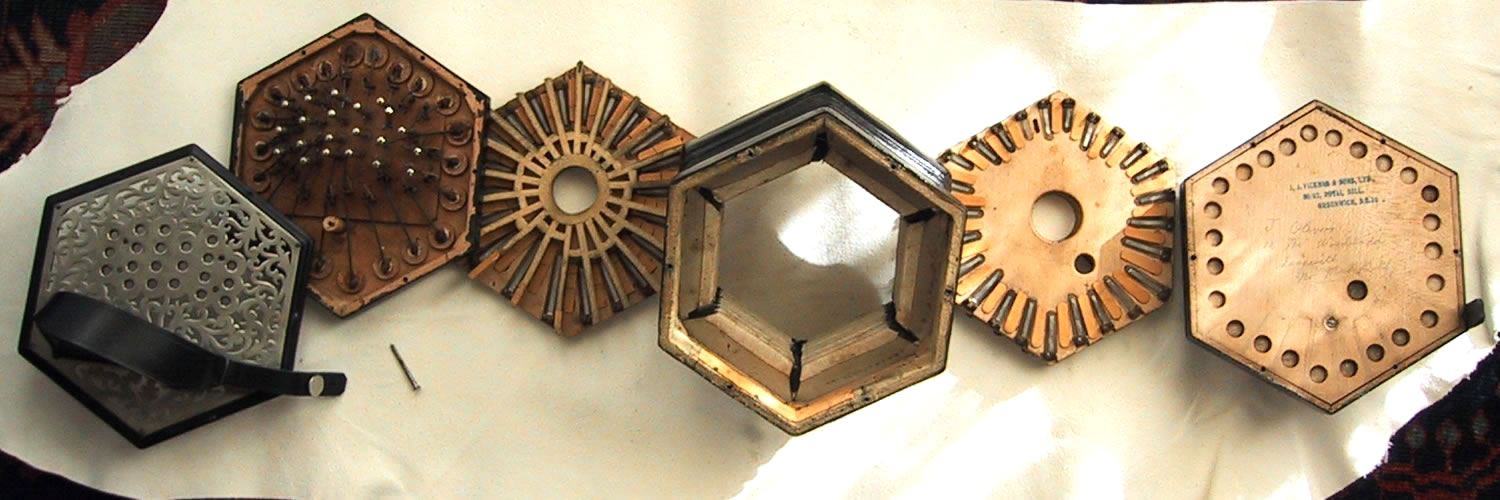
| End | Pad-Board | Reed-Pan | Bellows | Reed-Pan | Action-Box |
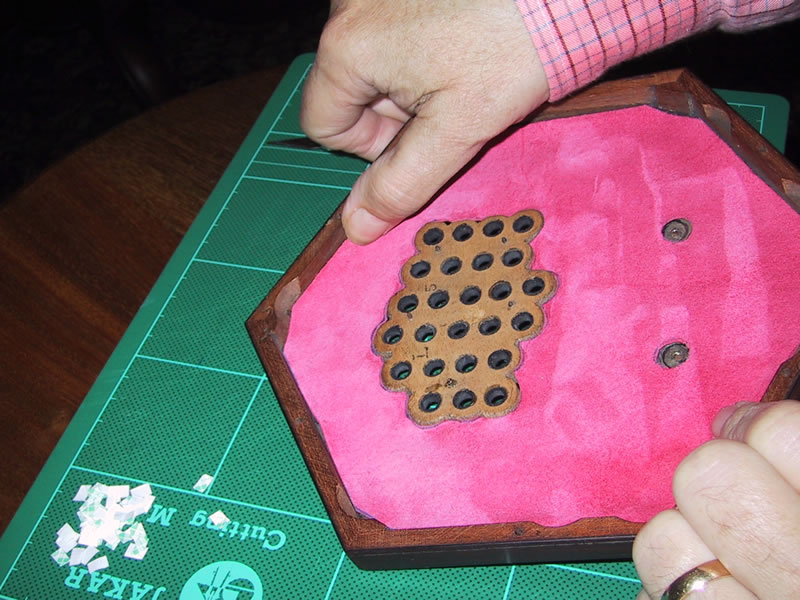
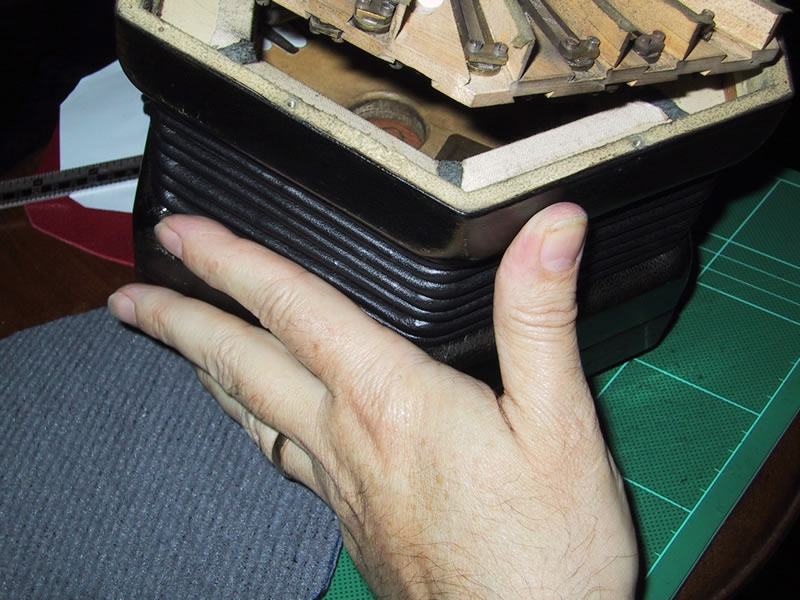
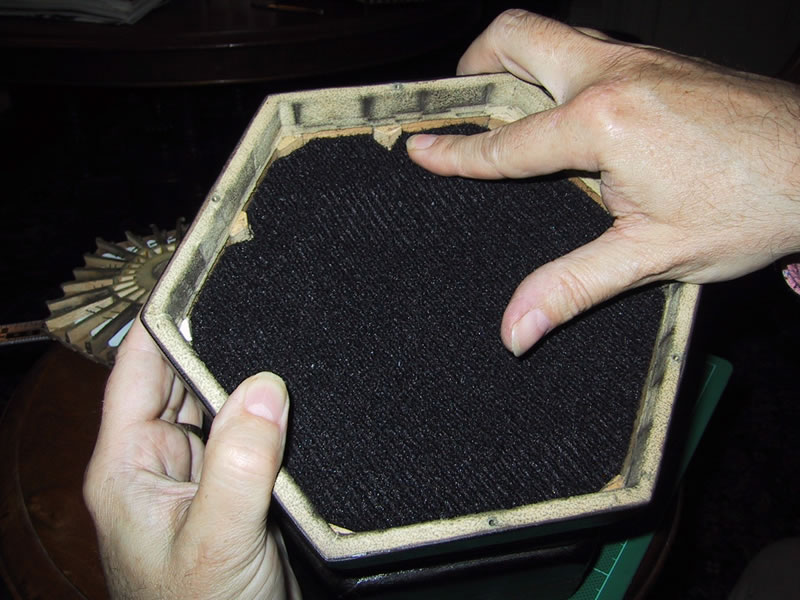
To disassemble a concertina, one removes the End-Bolts from an Action-Box (it's best to open up only one end at a time). This should be done carefully with a proper screwdriver, and working in a sequence such as 1-4-2-5-3-6, both for disassembly and reassembly, by stages so as to avoid stress distortion of the components which must seal exactly to be air-tight. Provision must be made that each End-Bolt will later go back into the same nut from which it was removed, so some system to assure this must be adopted when the End-Bolts are removed (such as pushing the bolts into labeled holes in the bottom of a styrofoam coffee cup or a block of foam). Once the End-Bolts are removed, the Action-Box lifts off, exposing the Reed-Pan within the Bellows-Frame. The Reed-Pan can be removed from the Bellows-Frame by just lifting it out, usually by putting a thumb through a hole near the middle.
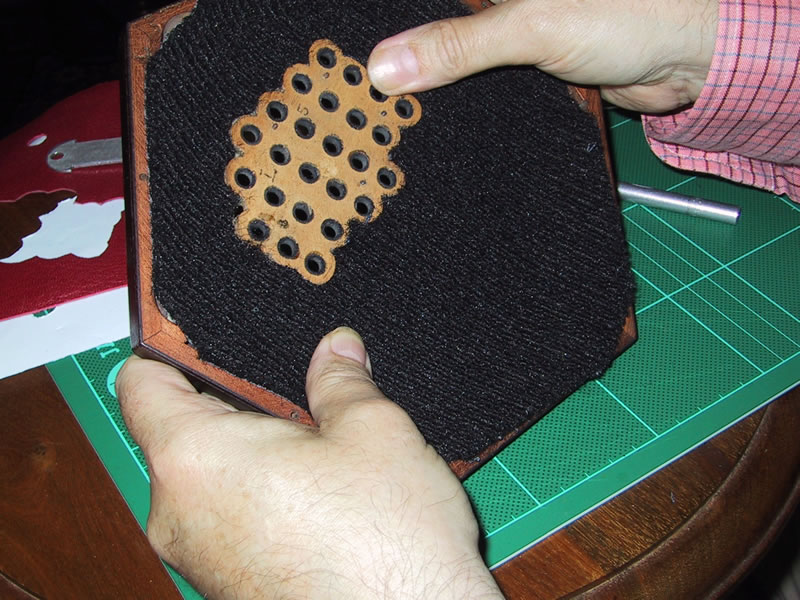
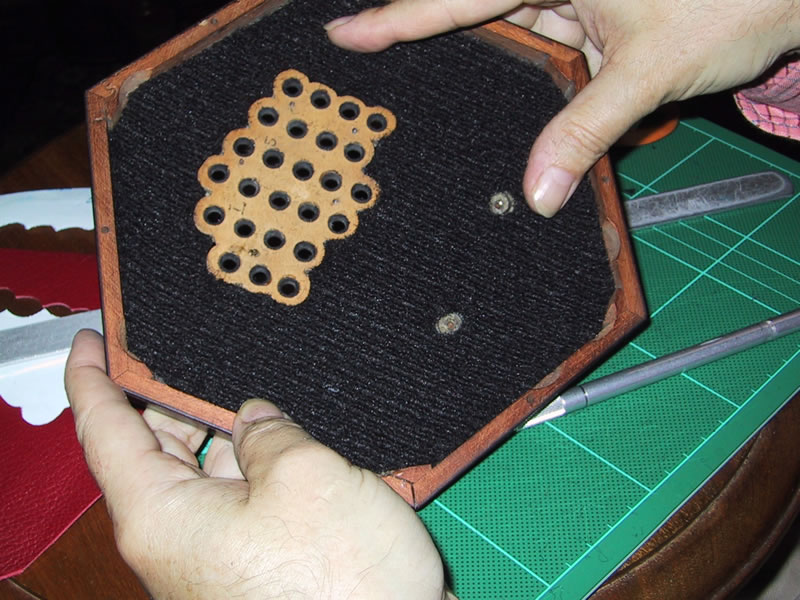
The two Reed-Pans hold all the Reeds, mounted on both sides of each Reed-Pan. Each Reed-Pan has on one side (its outside) air-tight walls which divide its area up into Reed-Chambers. Within each Reed-Chamber are two Reeds tuned to the same note, one on the inside (sounds on the push) and one on the outside (sounds on the pull) with leather Valves to assure that only one Reed of a pair sounds at the same time. Every Reed is precision-mounted in an individual Reed-Frame (Reed-Shoe), and then these Reed-Frames are simply pushed into dovetailed slots cut around the edge of the Reed-Pan where they are held by friction.
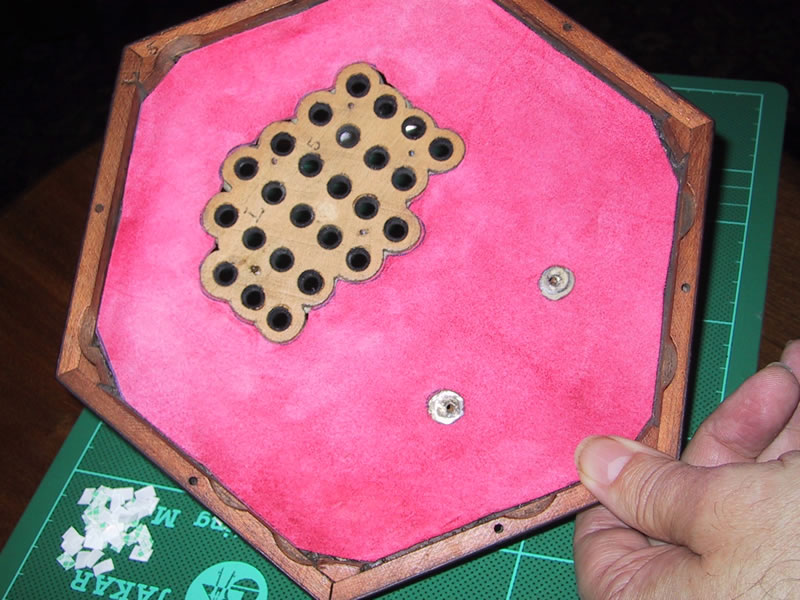
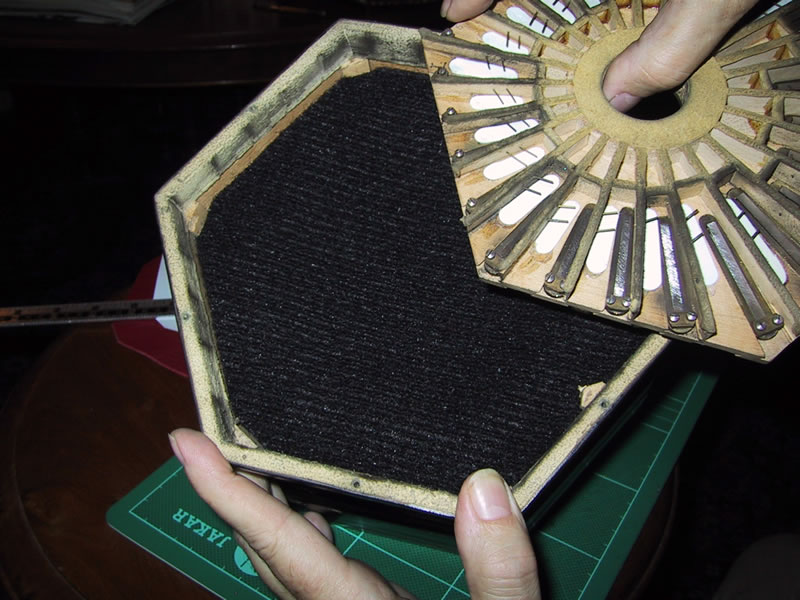
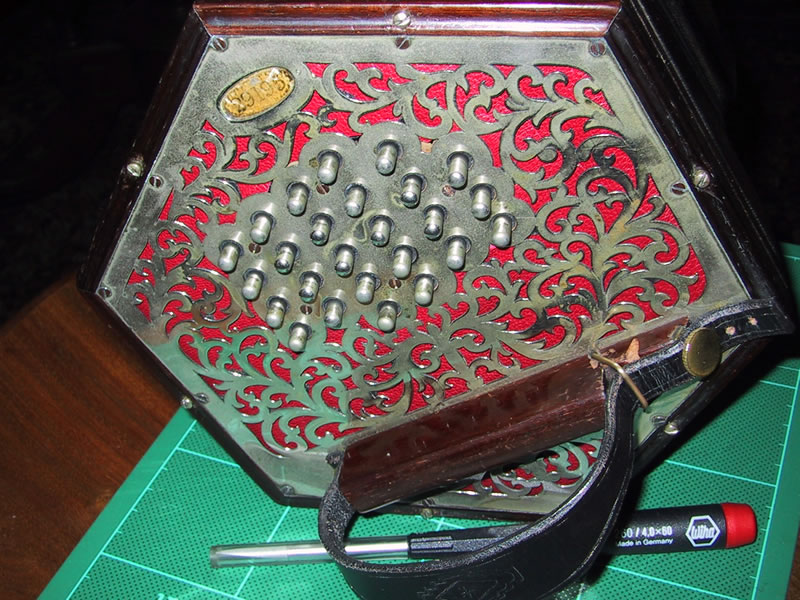
Each Action Box consists of a flat Pad-Board which fits against the corresponding Reed-Pan, and an End covering the Pad-Board. The End is a frame with a face of open fretwork (wood or metal) through which the Buttons protrude. The holes for the Buttons are "bushed" with a special felt, so that air leakage around the Buttons is minimized. In the case of metal Ends, a separate Bushing Board is mounted inside the metal End. Concealed by the End, mounted on the Pad-Board, are the Action mechanisms which use the push of a Button to permit air to flow through a Reed and thus sound a note. The way this works is that the Pad-Board, as it seals against the walls of the Reed-Chambers on the Reed-Pan, contains a small hole positioned over every Reed-Chamber. Normally each hole is covered by a Pad on the end of a Lever, with a Spring attached to the Lever forcing the Pad to close the hole air-tight. The lever is attached to the top of a post acting as its fulcrum, and then the other end of the Lever passes through the shaft of a Button, so that when the Button is depressed it moves the Lever, overcoming the Spring pressure, and the Lever lifts the Pad from its hole allowing air to pass through the Reeds in the corresponding Reed-Chamber.
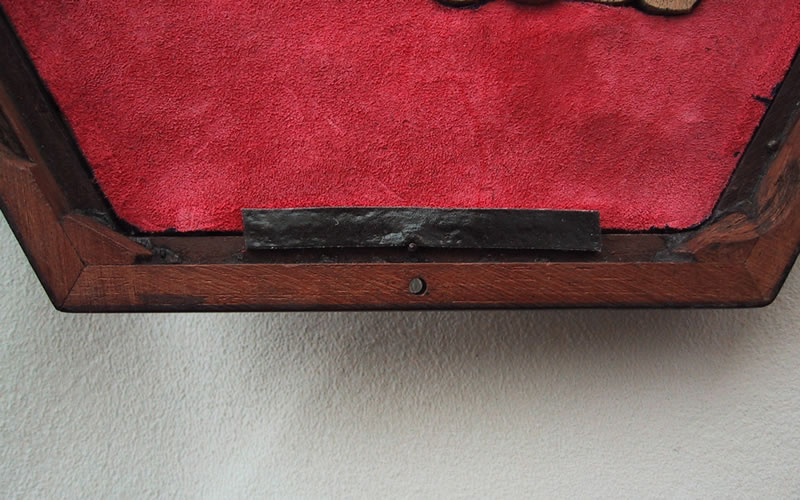
Each Action-Box can be disassembled by removing the End from the Pad-Board. The End is held to the Pad Board by Retaining-Screws which run from the inside of the Pad-Board, through one to three cylindrical Sound-Posts, and into the End. Duets have these Sound-Posts and Retaining-Screws located under the Palm Rest; the Retaining Screws are removed from the inside of the Pad-Board.
To prepare to install baffles, one must (on each end in turn) remove the End-Bolts to separate the Action-Box and the Reed-Pan from the Bellows, and then disassemble the Action-Box by removing the Retaining-Screws to separate the End from the Pad-Board. It is reasonable to take care in doing this, because all the parts are old and difficult to replace, but there is no need for exaggerated precautions. Concertinas were designed to be disassembled for maintenance, repeatedly, and to go back together without needing any tedious adjustments. The parts which are in precise alignment (e.g., the Reeds in their Reed-Frames) do not need to be disturbed. (For further information about disassembling and reassembling concertinas, consult the section on Repair Techniques in the Concertina FAQ.)
10. How I Make Templates
My first step is to make paper templates of the exact size and shape to fit each end. This is the most important part of the process, and should be seen as the basic task. The reason for doing this is that the precision with which the leather baffles are cut turns out to be of great importance--a difference of about 1/64" (less than half a millimeter) all around can reduce the effect of the baffle by half.

(Click on any small photograph in this document to see a larger version;
click ‘Back’ to return to this document.)
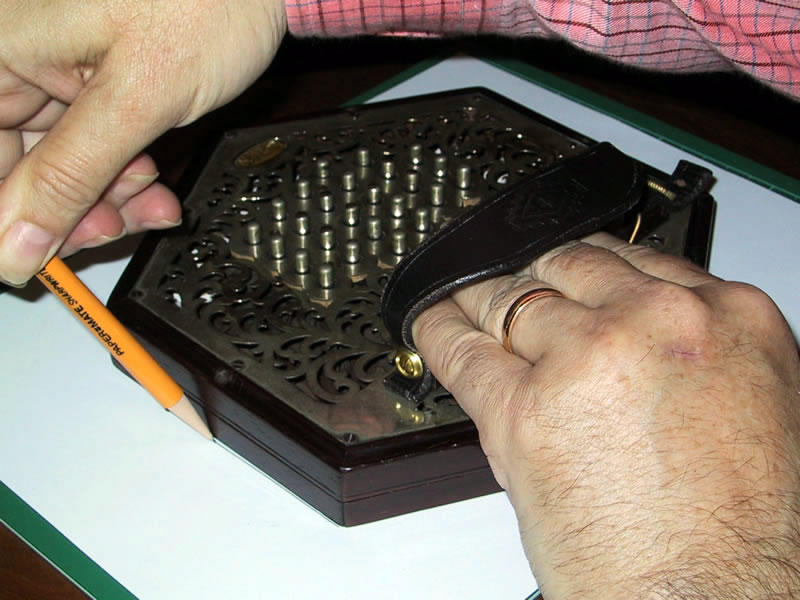
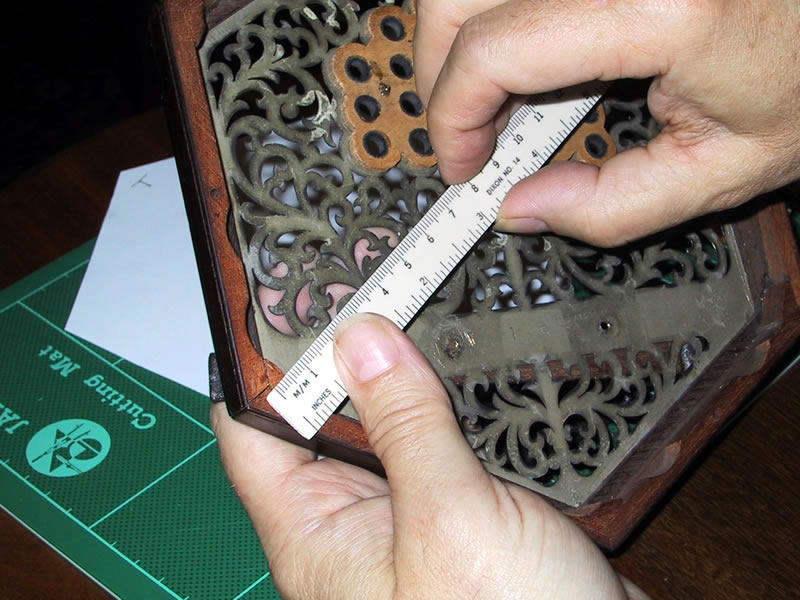
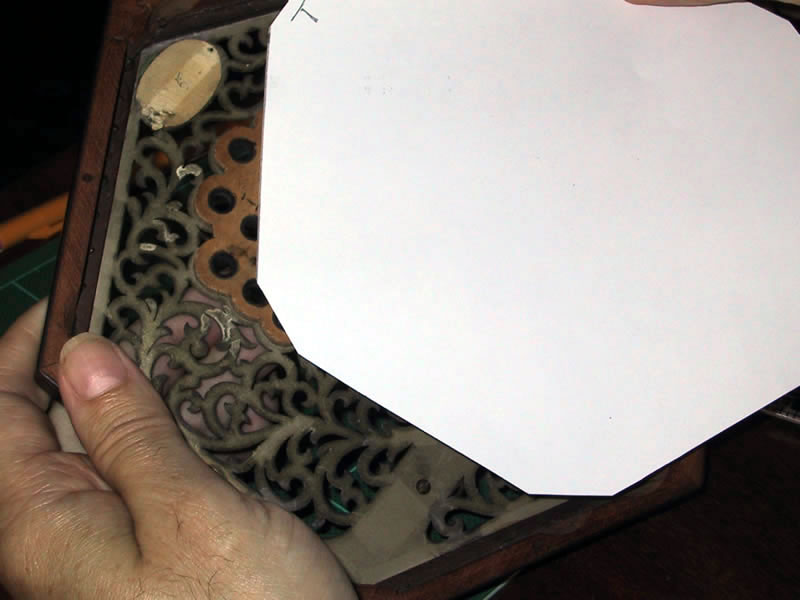
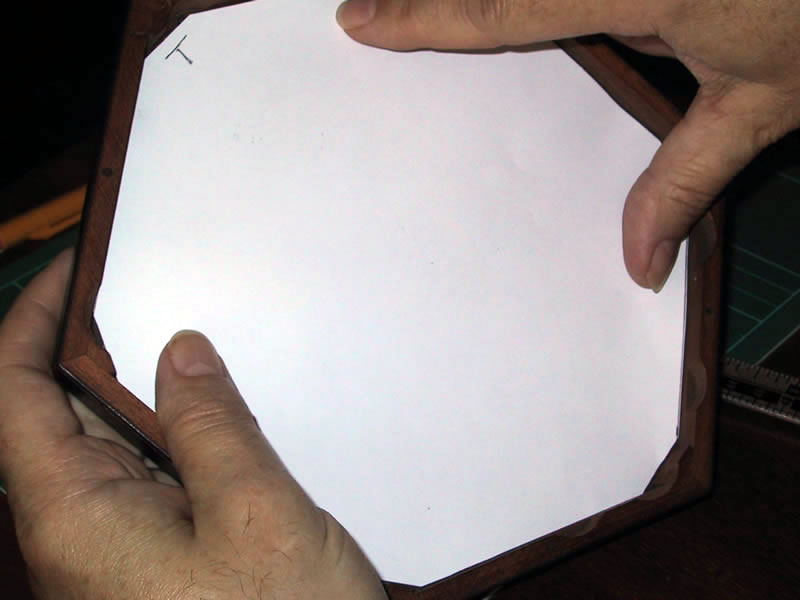
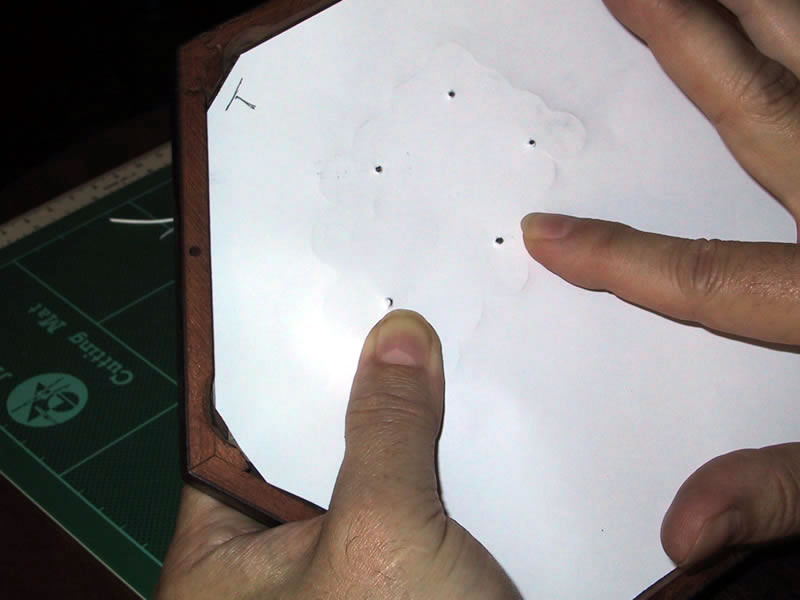
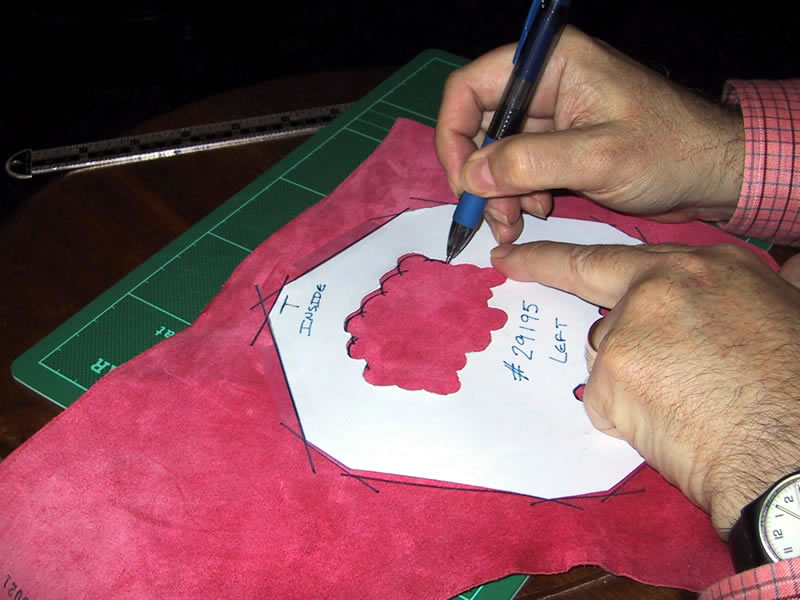
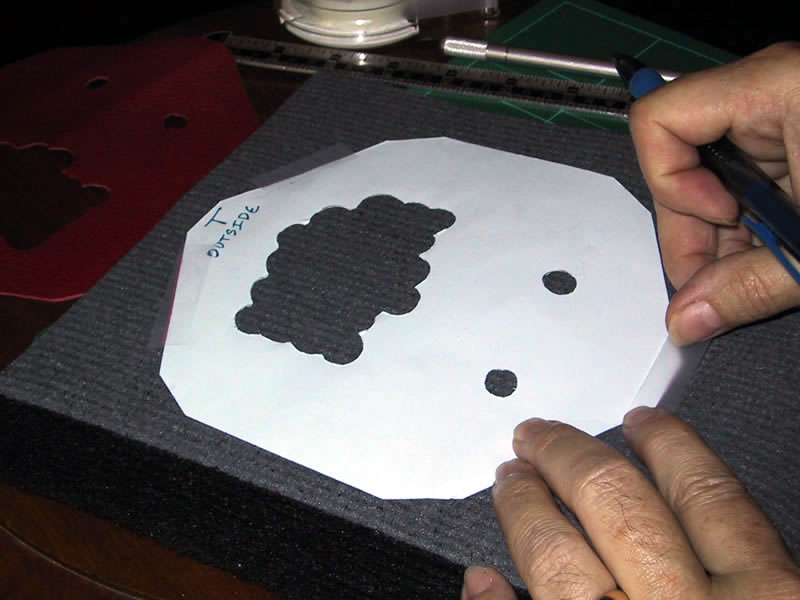
To begin, I put a sheet of paper (something like heavy (24lb, 90g) laser-printing paper in white is ideal) down flat and lay the end on it, with the strap upward. I draw around the end with a pencil, and mark which point of the drawing is the "top" (away from the palm-rest). It is unlikely that the concertina is exactly symmetrical, so the template must be oriented the same way throughout. Then I turn the end over, and measure with a ruler the thickness of the wooden sides. On the paper, I measure toward the center by this distance along each edge, and draw a new outline within the first. This is quite close to the inner size of the end. Then I cut the template shape out of the paper.
I lay the template inside the end, making sure the top is aligned properly, and see how it fits. It should just touch all the sides of the End. If there are blocks glued at each point, I measure how big they are and carefully trim off the points of the template, and try again. If the frame has a "stepped" profile, ordinarily the template should go inside the smallest part, flat against the fretwork of the end. If the template is too big on one side, I carefully cut off a very slim strip along that edge (or part of it) and try again. If the template is too small, I mark which edge should be wider, then put the template on another sheet of paper and cut a replacement a trifle bigger. The aim is to get a template which just fits perfectly everywhere.
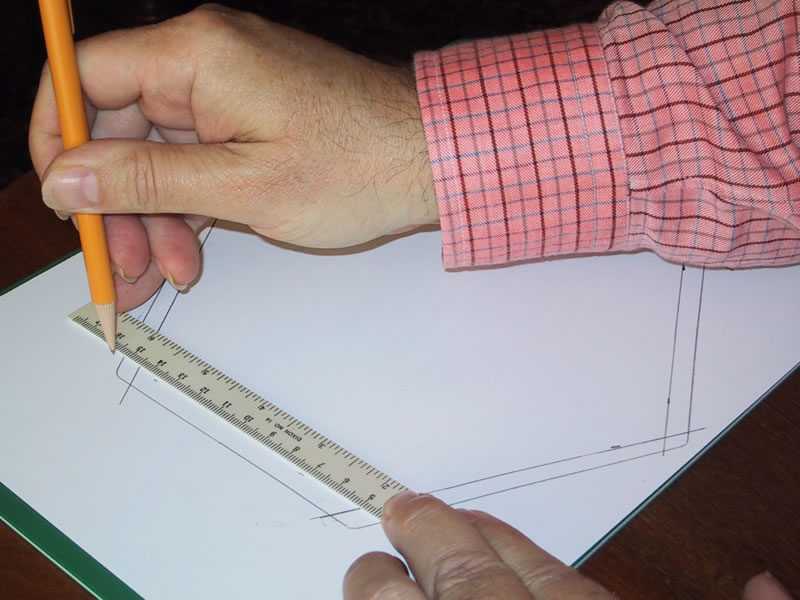
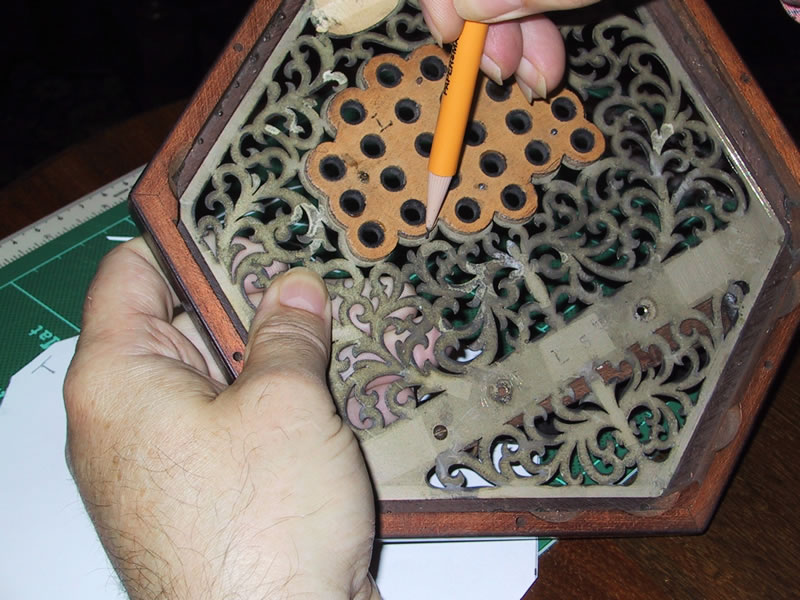
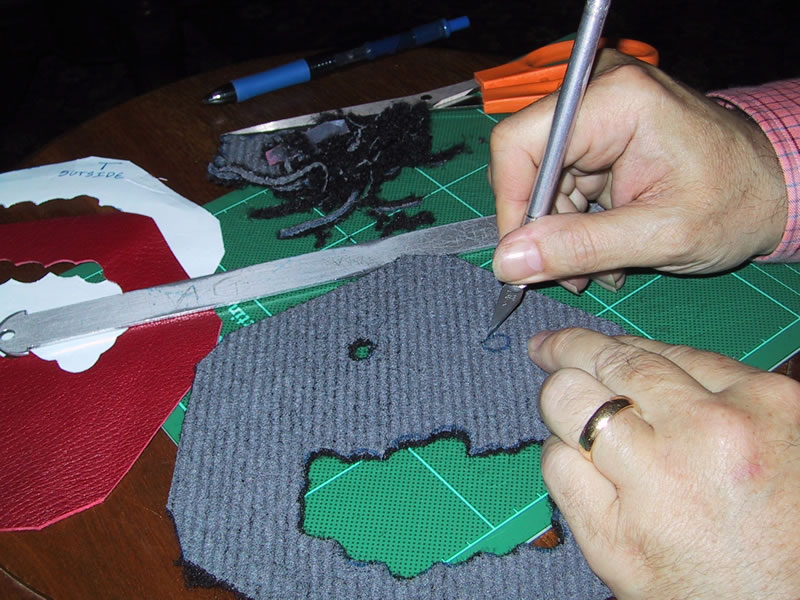
Next I cut out the area around the buttons. This must be done with great precision, not roughly. To accomplish this, I use a soft lead pencil to deposit graphite on the inside of the end. If I am working on a metal end with a bushing board, I want the baffle to come up snugly against the outside of the bushing board. So I rub the pencil point along the top outside edges of the bushing board, all the way around; then lay the template into the end (top and edges properly aligned) and rub with my finger along the edges of the bushing board; a line of graphite transfers to the paper. I remove the template, and carefully cut along that line. Then I try the template in the end, making sure that it settles tightly (but without stretching) around the bushing board. If it does not, I mark where more paper must be removed, take it out and trim a tiny bit. As before, if I cut too much, I just transfer the template to a new sheet of paper, cut it out a bit bigger where needed, and continue.

If I am working on an instrument with wooden ends, then there will be a strip of wood which surrounds the buttons in the pattern of fretwork. I draw a graphite line close to the buttons, so that the leather baffle will overlap the wooden strip around them; very little clearance is necessary around the buttons. (Later, a continuous line of bits of tape will be placed along this overlap, to pretty much seal the baffle around the buttons.) Once the line is drawn, I insert the template, rub with my fingernail to transfer a pencil line, and cut along the line as above. Lacking the bushing-board means that it is significantly harder to repeatedly put the baffle accurately in the same position.
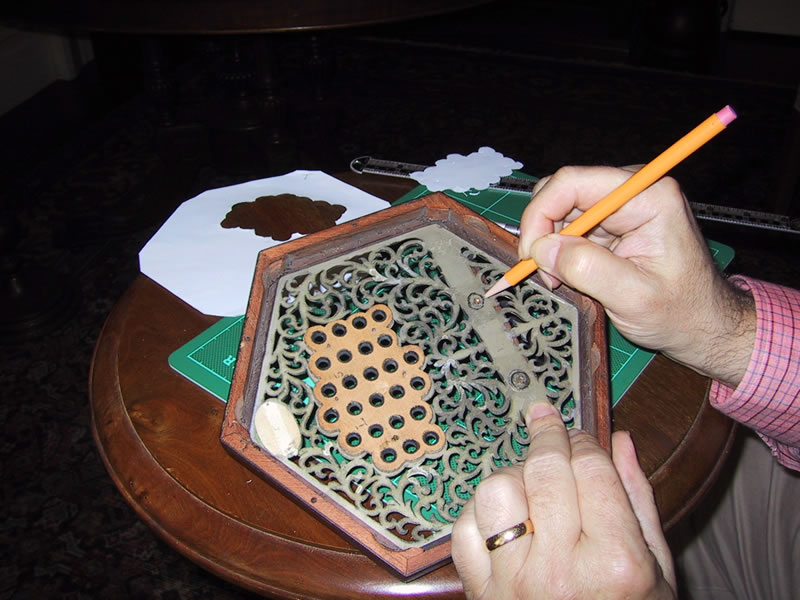
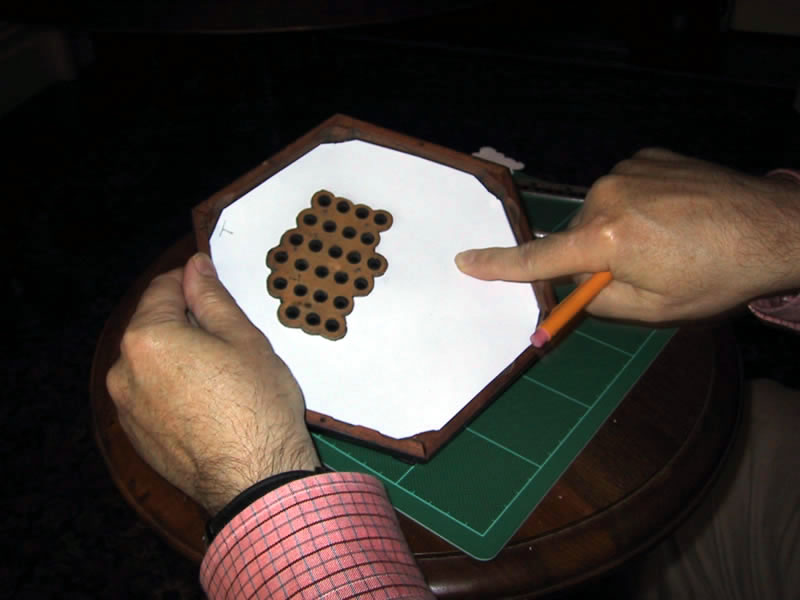
I continue this until the template conforms just about perfectly to the outside of the bushing board (or border of the button area), and when anchored there just about perfectly fills the end to each of its edges and corners.


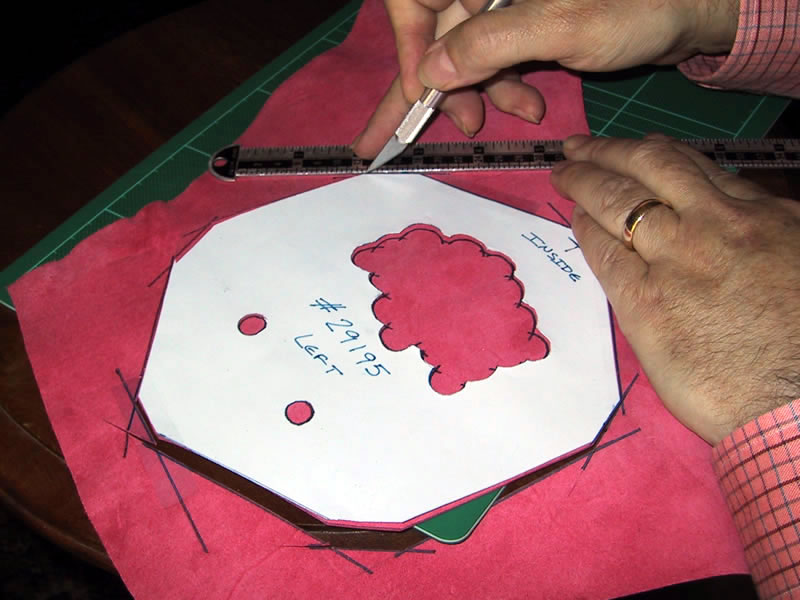
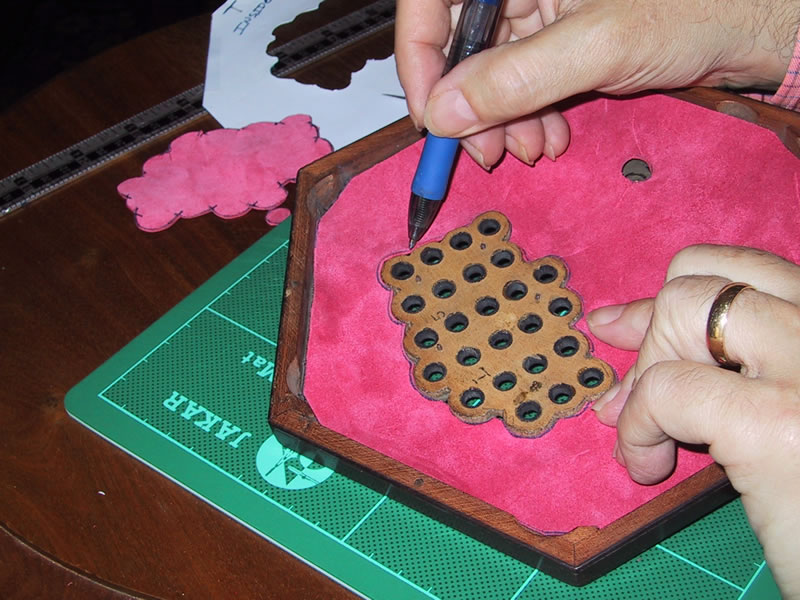
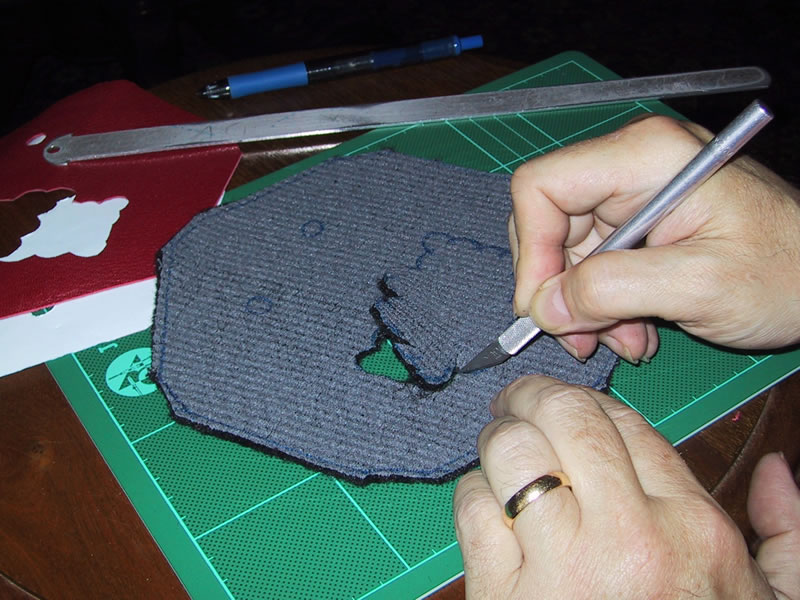
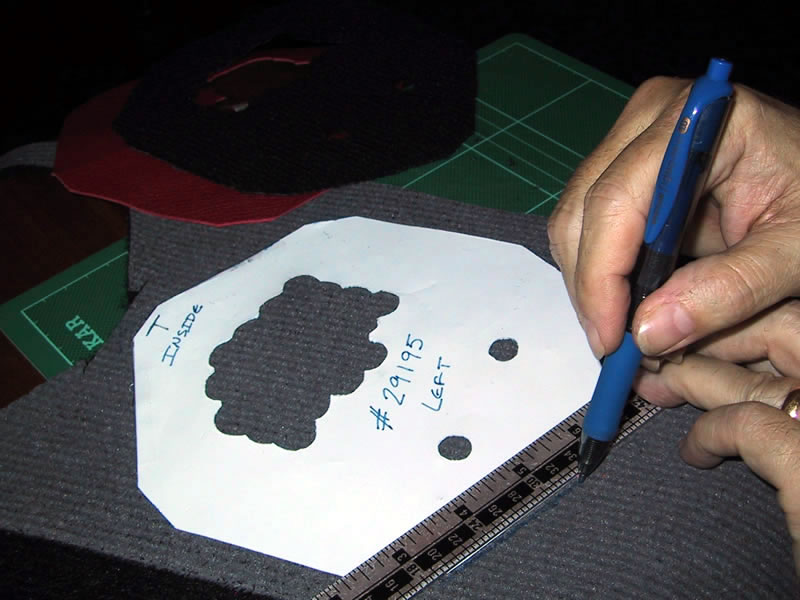
There is only one more step: marking the soundposts. The soundposts must be in good solid contact between the pad-board and the end if the sound is to be good. I forgot one time to cut holes for the soundposts, and inserted a leather baffle into a concertina so that the leather held the soundposts off the end--it sounded dreadful, choked and unmusical. The soundposts seem to play an important role in the concertina's sound, perhaps by conducting some sound to the entire end. So with the template in place, I mark each of the sound posts. This I do by drawing a circle of pencil graphite on the inside of the end where I can see the imprint of each soundpost, putting in the paper template, and rubbing with my fingernail to transfer the graphite to the template, and then cutting the hole for each soundpost.

(If by some chance there is an existing baffle or anything else that DOES run under the soundposts, it would be important not to just remove this--since it is effectively part of the soundpost. You'd need to remove the old baffle, either cut small discs from it or make replacements of exactly the same thickness, and glue the discs to the bottoms of the soundposts to permanently lengthen them. Then when making new baffles, be sure to cut a hole so that the soundpost as lengthened makes solid contact between the end and the pad-board. I have never seen anything along this line, although I have seen cases where the wooden soundposts have been extended with old layers of some thin material glued to their accessible ends.)
At this point, I mark on the inside of the template: (1) the serial number of the concertina; (2) Right or Left end; (3) the direction of the Top; and (4) which side of the paper faces into the action of the concertina (this last prevents wasting leather).


All this fiddling with every template is a fair bit of work, but it is vastly easier to make these precise adjustments on paper than on leather. When the first template is finished, I reassemble the first end and repeat the process for the other end of the concertina. Once I have the two templates completed, I carefully preserve them. It would not be a bad idea to laminate them, taking great care to cut the laminating plastic down to precisely the size of the paper (I've never done this). Be sure each template is labeled with the serial number of the concertina, which end (left or right), which direction is the top, and which side faces out, which faces in.
11. How I Cut and Fit Leather Baffles
Once I have proper templates made, the correct goatskin leather, and the correct double-sided tape, the process of making and fitting a baffle is straightforward.
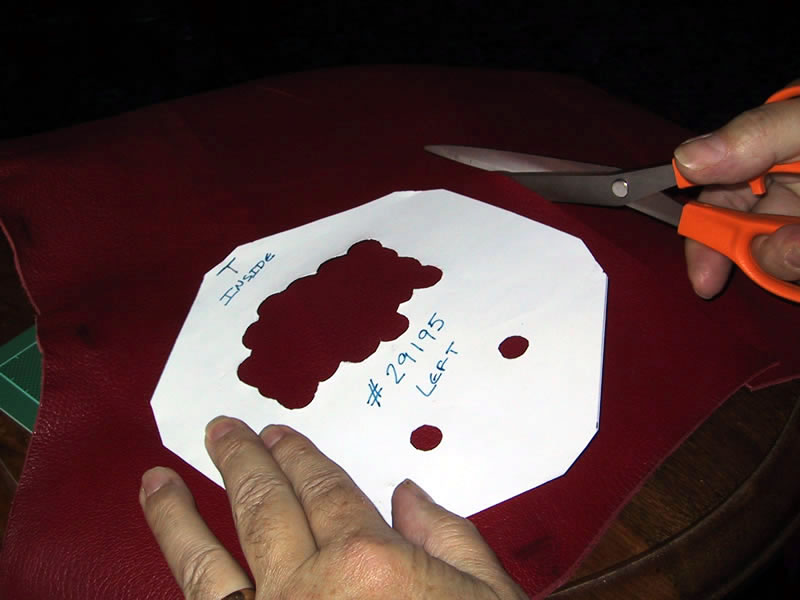

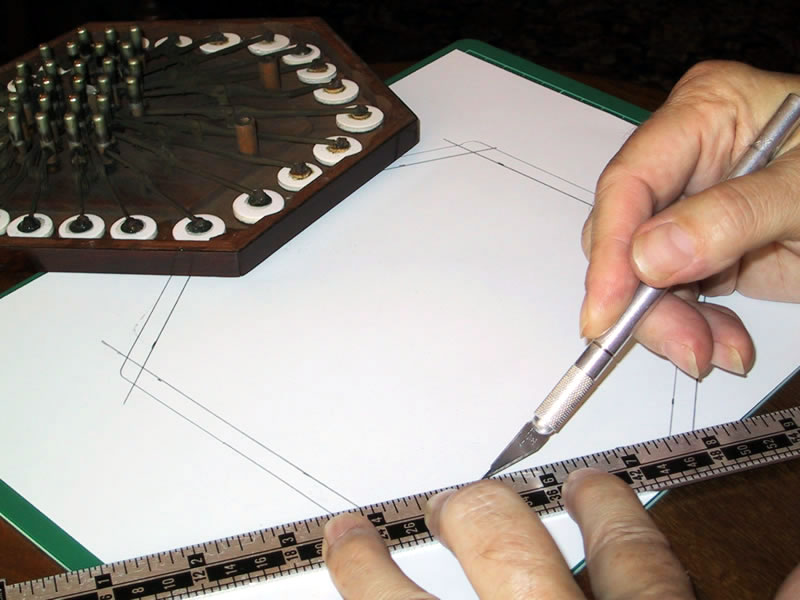
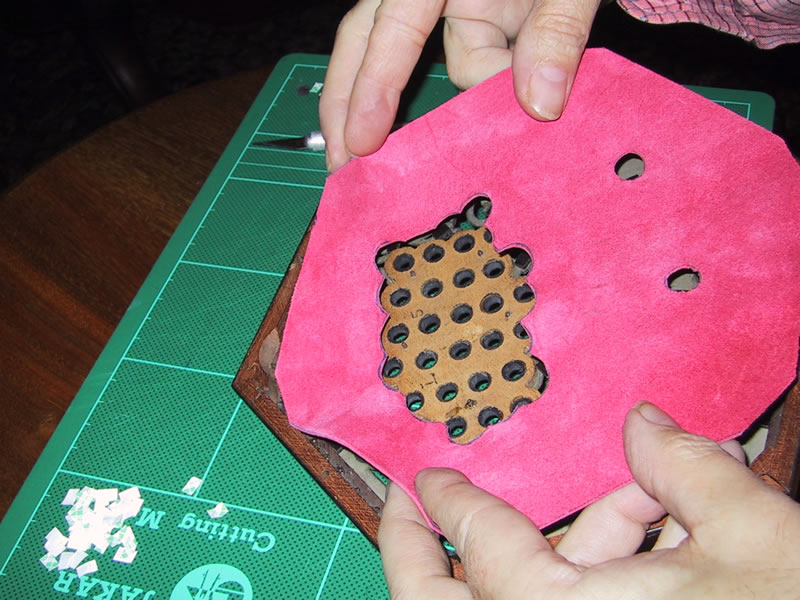
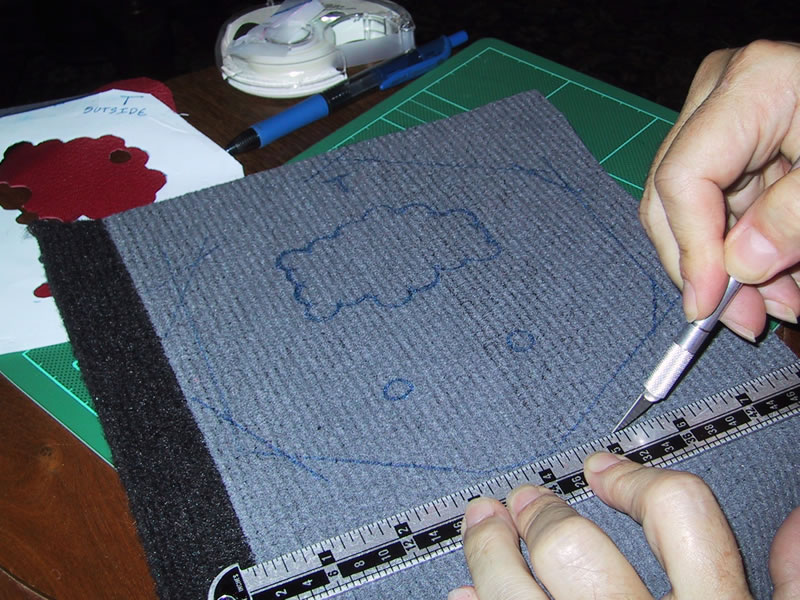
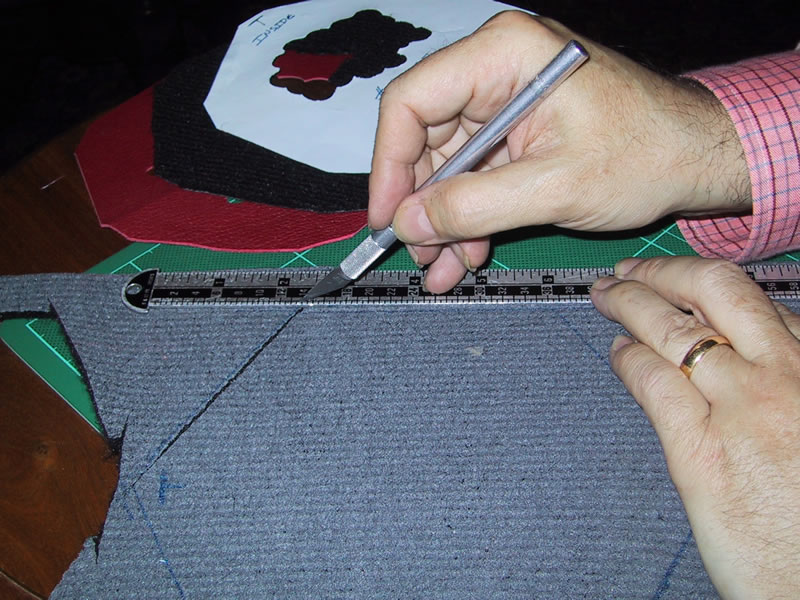
On a suitable self-healing cutting mat, I put the leather face (grained side) down. I tape the template to the back of the leather, making sure that the inward-facing side of the template is up (in the finished baffle, the grained side will face out so it is visible). With a ball-point pen (not liquid ink which could soak through the leather) and a straightedge, I mark the outside edges, and carefully draw around the holes for the button-array and for the sound-post(s). Then I remove the template, and cut out the marked shape in the leather. I use a craft knife, very sharp and with a sufficiently-thin point to easily cut the curves required.


If the template fits the end exactly, then when the baffle is laid into the end of the concertina the leather should also fit just exactly. It is prudent to err in cutting on the "large" side of the lines, so that the exact fit can be achieved by trimming--leather is expensive.


I found that I was able to reduce the volume by a large amount only when I cut the leather with extreme care--meaning that I cut the template very carefully, then cut the leather larger by the width of a ball-point pen line, then (taking advantage of a bushing-board to be able to position the baffle repeatably) re-cut each edge (or part of an edge) separately by minute amounts, shaving each edge in two or three or four operations (replacing and checking the baffle after each cut) until the leather just exactly fit flat against the fretwork, completely filling the area from the bushing-board to the outside frame, but without being compressed against the frame. The gap might be as little as 1/64" (0.4mm) for a maximum amount of reduction, or 1/32" (0.8mm) for an ordinary amount of reduction. (Much more on this below.)
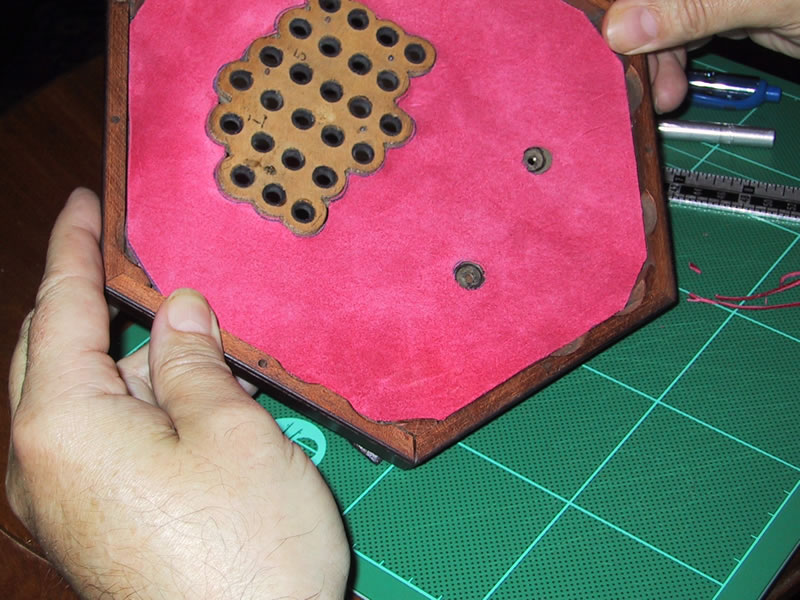

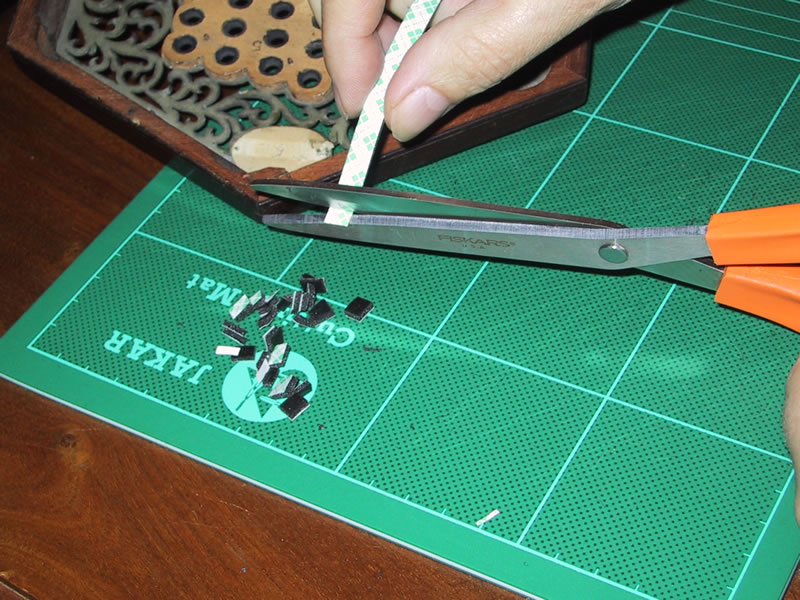
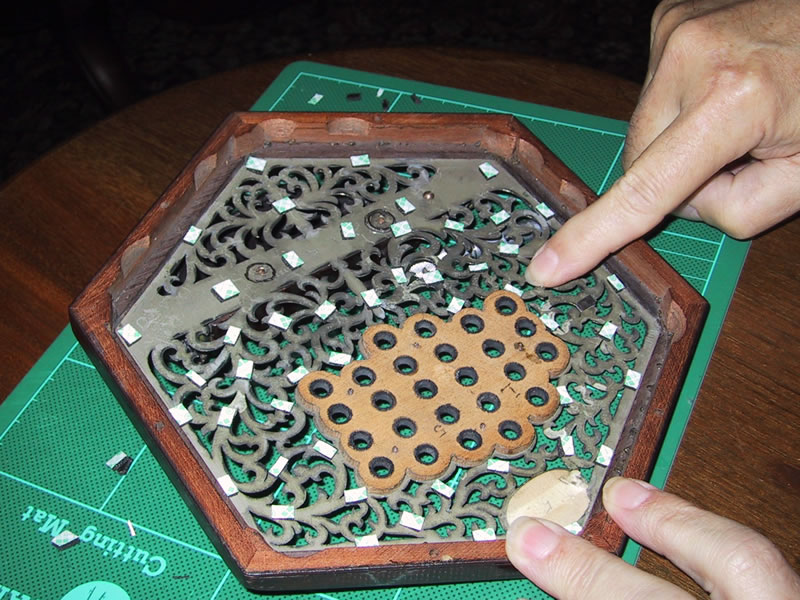
Once the leather baffle is cut, I set it aside. I take about six inches of the double-sided tape, and cut it across into 1/8" strips (so each piece is 1/8" by 1/4" by 1/16" thick), yielding 48 pieces. These bits of tape I stick on the inside of the fretwork of the instrument. You want to be careful not to put a solid line of tape bits around the outside edges--that could seal the end. I put only two or three of the tiny bits along each edge, eight or ten of them around the button area, and the rest randomly scattered over the fretwork wherever it is big enough. The black tape will be invisible after assembly so long as it does not project into openings; if a corner does stick out, I use the tip of a knife blade to cut off the projecting corner. When all the bits of tape are distributed, I press them each down with a fingertip (on the paper liner, still in place) to be sure that they adhere. (If the tape does not stick well, the inside of the concertina end may be dirty; it should be cleaned so that the tape will stick.)


In the case of a wooden-ended instrument without a bushing board, there is no way to cause the baffle to fit close to the bushing board to create a narrow slit. So for these instruments, more tape is needed. I cut more of the 1/8" by 1/4" bits of tape, and assemble nearly a solid line of these along the strip of wood outside the buttons--the part overlapped by the baffle. These bits don't need to be butted end-to-end, but I close up about 85% of the line around the buttons. This reduces the leakage around the buttons to someplace close to that experienced with a bushing board--much reduced, but far from zero. This may take another 48 bits of tape, for a larger instrument.
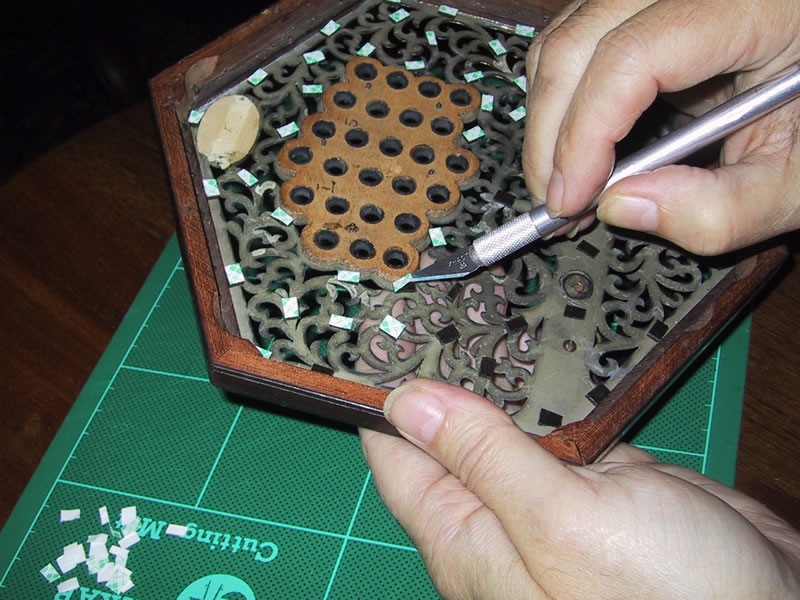
Then I remove the paper liner from the tops of all the bits of tape (using the point of a knife, or very sharp tweezers of the sort made for electronics assembly) to expose the top adhesive. Now the work becomes delicate. I carefully position the baffle, with the grain-side down facing outward, and ease it toward the tape. If the concertina has a bushing-board, I hold the baffle with all edges curled slighty upward so that the cut-out for the bushing board can be precisely positioned first, and then let the rest fall when that is accomplished. If the baffle is slightly mispositioned, I try to pick up an edge with a knife blade and try again. I try to avoid allowing the adhesive to grip the leather until it is in the correct position; but so long as the leather is not pressed into the adhesive, it can most likely be peeled away gently, certainly up to an hour or so, and in my experience up to 24 hours later. The adhesive gains strength over 48-72 hours, so tests and adjustments should be done in the first day. When the baffle appears to be in place, I reassemble the end and try it out. If necessary, I can disassemble the end again and adjust it. Pulling the baffle out may bring some of the bits of tape with it; if so, I carefully "roll" them off the leather with a finger, and install new replacement bits of tape on the end of the concertina before trying again.
When the baffle is in final position, I then gently press the leather onto each of the bits of tape beneath it. I'm careful to see that the fretwork of the concertina is well-supported during this--pressing in mid-air without support behind the fretwork could bend or break the fretwork of the end, or could separate the framework at one of the corners, both very bad events. After this is done, the leather can still be removed, but most of the bits of tape will probably come out too; after a day or more it can still be removed from the concertina bringing all the tape bits with it, but when the tape is removed from the leather, even gently rolled off, it will most likely leave a mark on the leather (which will, however, be at least mostly under a part of the fretwork, since that's where the tape bits are). The concertina should be unharmed.
Effects of Precise Baffle Size
The reduction in the sound of a concertina after baffles are installed seems to be extremely sensitive to the exact size of the leather. The same kind of leather, installed in the same way, using the same double-sided tape, can reduce the volume in the same concertina by as little as -1 or -2 dBA (an almost unnoticeable reduction) up to as much as -10 or -11 dBA (half the unmodified volume level)--the only difference being how closely the leather is cut to fit up to the inside edges of the frame. An almost-unnoticeable difference in cutting the leather can make far more difference in the results than I ever expected. (But since I made these measurements, Göran Rahm has told me that he had also encountered the apparently critical tolerances necessary to control the effects of baffles during related work that he did on concertina acoustics some fifteen years ago, and I have confidence that the observed effects are real.)
I found that I was able to reduce the volume by -10 dBA or more (a maximum reduction) only when I cut the leather with extreme care, so that the leather just exactly fit flat inside the wooden edge of the end, completely filling the area from the bushing-board to the outside frame, but (important point) without being compressed against the frame. The gap along each edge might be as little as 1/64" (0.4mm) for a -10 dBA reduction.
If I should cut a baffle just the slightest bit short of full (which can easily be done without intending to do so), so that I could see a tiny void between the baffle and the frame along each edge--about 1/32" (0.8mm)--then I got a reduction of about -5 dBA. And if I cut the leather so that there was about 1/16" (1.6mm) visible between the leather and the frame, then I got a reduction of only about -2 dBA (almost no effect). It is not clear why such a very small difference in the size of the baffle should make so much difference in the effect; after all, there is always air escaping through the bushing around the buttons, and possibly elsewhere. But repeated experiments and measurements seem to show that the small difference is critical.
A wider gap is useful when one does NOT want to reduce the volume of the end very much--when the baffle is being fitted mostly to have an effect on the tone and for its cosmetic appearance. When aiming to do this, I have had success by cutting the baffle to the exact size of the template, and then marking exactly 1/16" off each edge. After verifying that trimming this much will not leave a visible gap along any edge, I trim the leather by the 1/16" all around. The result is the appearance of a baffle, a "sweetening" of tone, and almost no reduction (-1 dBA to -2 dBA) in the volume of sound from that end.
When making adjustments by shaving the edges, it is easy to remove too much leather and produce too much air flow, so that the volume is now louder than desired. A fix which will work within limits is to add some double-sided tape overlapping part of each edge--say, one or two inches in the center of each side--to reduce the total area of the slit, until the airflow is again lowered so that it is the same as that of a narrower slit.

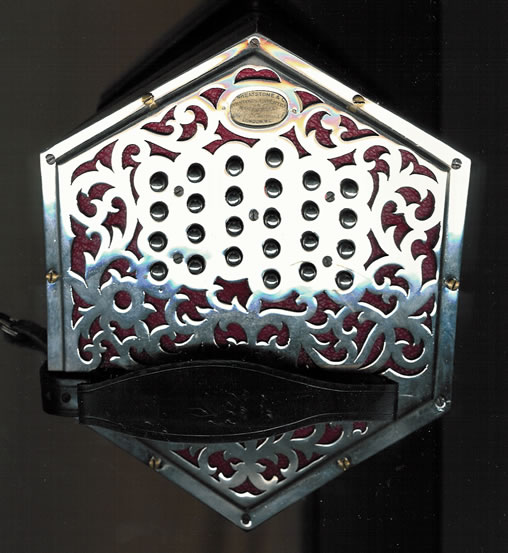
Close-Cut Baffle with gap about 1/64" for -10 dBA reduction (about half original volume) |
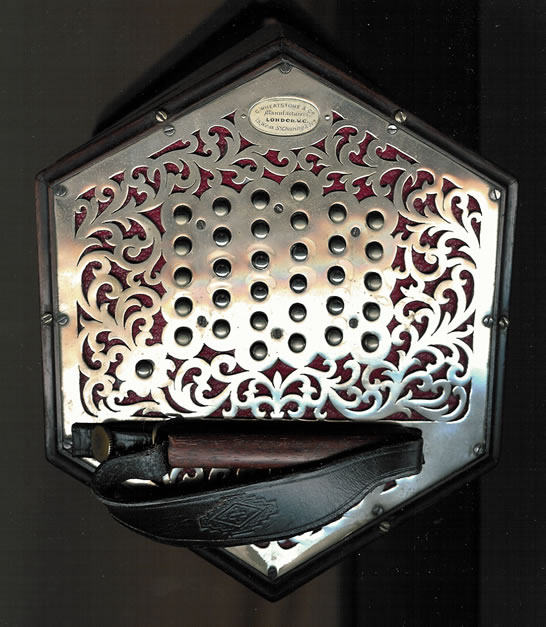
Semi-Close-Cut Baffle with gap about 1/32" for -05 dBA reduction plus tape for -10 dBA reduction |

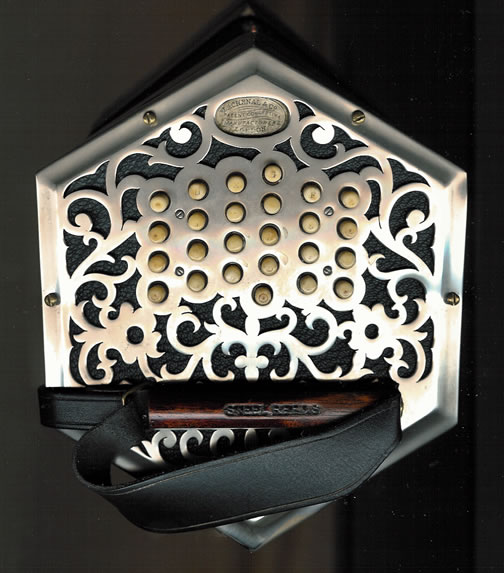
Loose-Cut Baffle with gap about 1/16" for -02 dBA reduction (just noticeable) |
People worry about "blocking the air" when adding baffles, and sometimes purposely leave open areas for the air to get out/in. This concern is correct, but it is important not to overestimate the area required--it is extremely small.
Consider some rough estimates. When three keys are depressed to make a chord, that lifts the pads from three holes. Each hole is about 1/2" in diameter. A round hole of 1/2" diameter has an area of less than 0.2 square inches; three of them total less than 0.6 square inches. When a baffle is installed, the slit around the edge (between the baffle and the end all around) will be at least 20 linear inches, even on a small six-inch hexagonal instrument. If it is 1/32" wide, then the total area of that slit will be slightly larger (0.625 square inches) than the area of the three pad holes.
So, as calculated, there should be enough area for all the air through three pad holes to move through a 1/32" slit around the outside of the baffle, even before taking into account leaks, or the further slit around the bushing board, or the bushings around the keys--all of which exist. Even with a 1/64" slit the area (half as much) should be ample with those additional leaks. The slit has an effect on the quality of the sound--but this is apparently because of the geometry of the air path and the dispersal of the air all around, not because the air is prevented from getting in or out.
Of course, that slit all around does need to be there--if you close up the slit, then you will have problems. The bellows could become slightly harder to move, but before that (in my experience) the tone will become "gravelly" or "rough" rather than the desired "sweeter". I observe that (1) the rough sound will sometimes be heard first in a chord, even when each individual note played alone sounds pretty good; and (2) the same rough sound can be produced by any particular mechanism of closing up the slit--by using too thin a mounting tape, or by taping all around the baffle to close the slit, or by cutting the baffle too large so it wedges tightly against the frame all around leaving no slit. My experience is that the "rough" effect appears very quickly. So if I discover that my baffle produces this tone in a chord, then it is necessary to cut it VERY VERY slightly smaller--which can entail quite a lot of re-work. The temptation is to "make sure to get it small enough", but this always produces a baffle which is then too small and thus fails to reduce the sound enough. The "gravelly" or "rough" effect can be removed by shaving an almost undetectable amount off some part of the edges. (It's important to remember accurately what the chords sounded like before baffles were added; it would be easy to mistake the naturally-strident tone of the concertina for an imaginary problem.)
Another possible symptom of too little slit area is that the concertina can be at pitch when played at normal pressures, but can sound lower in pitch (flat) when the bellows are pulled or pushed sharply. This symptom varies from one concertina to another, so it seems to depend on the properties of some reeds, as well as on the baffle. If this is the only symptom, then the amount of additional gap needed is even less; a tiny amount cut for the length of one inch on a single side should be enough. (Again, diagnosing this requires some care, since the variation of pitch with sharp pressure is present to a very slight degree in many instruments even without baffles.)
When properly cut, even baffles with maximum effect need not have any of these problems. In measurements reported below, Wheatstone #29195 was fitted with very close-cut leather baffles producing a reduction of -11 dBA and additionally with acoustical fabric for a total reduction on the left side of -15 dBA; it has no rough tone, and no flatting of pitch at all on strong bellows movements.
12. How I Cut and Fit Acoustical-Fabric Baffles
I begin with the paper templates made in the first step, the same ones used for the leather baffles. As with the leather, the template is taped to the back of the acoustical fabric, and a ballpoint-pen line drawn with a straightedge along each side and corner.
IMPORTANT POINT: a leather baffle has its grain facing out (through the fretwork) and its back toward the bellows--but the fabric baffle must have its acoustically-active face facing INWARD toward the bellows, and its unattractive coated back outward toward the fretwork. So the template must be put on the back of the fabric UPSIDE DOWN from the way it is put on the back of the leather. Ignoring this is an easy mistake to make.

Unlike the case with leather, there is no need to make the fabric baffle to an ultra-precise size--slight variations make no difference in function. The fabric will compress slightly, and should fill the end all the way to the edges; moreover, it can be held in place by friction against the edges so that no tape is required, another motivation to be sure that it is big enough. What I did was to cut out the fabric about 1/16" outside the lines transferred from the template, along each edge and corner; along the edge of the bushing board (if there is one) I also add the same amount, but in a wooden-ended instrument with no bushing board I cut to the template size; around the sound-posts I cut to the marked size (since the fabric must be out of the way of the posts).
After cutting out the fabric baffle, I try it in the concertina--face inward. It should be possible to push the fabric baffle in so it is held by its edges, and to stretch it a bit around the bushing board. If it is a bit too big so that it raises or buckles, I trim it slightly as necessary, bit by bit (scissors work well). My experience has been that such a fabric baffle can always be held in place by friction against the edges, with no need for any tape (but obviously, a spot or two of double-sided tape could be used if necessary.) The concertina can be assembled and tried with the fabric in place.
What I have always done (apart from measurement experiments) is to use the acoustical fabric to line the inside of a leather baffle. That is, a leather baffle is made and fitted as described above. Then the fabric baffle is made as just described, and pressed into the end of the concertina with its back against the back of the leather baffle.

There is a limited space inside the end of a concertina, but I have put both a leather baffle and a fabric baffle liner into a number of Maccann Duet concertinas (with both flat and raised ends, both metal and wooden, of all ages) with no difficulty. The full package is slightly more than one-quarter of an inch thick:
| double-sided 1/16th" tape: | 0.0625 inches | 1.6 mm |
| leather baffle: | 0.0400 inches | 1.0 mm |
| acoustical fabric liner: | 0.1750 inches | 4.4 mm |
| TOTAL: | 0.2775 inches | 7.0 mm |
This is just about equal to the available space, but ordinarily there is no problem. The parts of the concertina that can be interfered with by the acoustical fabric are the action levers that connect the buttons to the pads. Each lever is fixed to the top of a post acting as a fulcrum around which the lever pivots; usually this post is the highest point and it can press into the fabric a little bit with no effect. On a couple of instruments, though, I have found that the high points that pressed against the fabric were not the posts but rather some parts of the levers. If this is true, then when the concertina is reassembled there are two possibilities: (1) If the highest part of the lever is on the pad side of the fulcrum, then it may become harder to press down the corresponding button because the lever is hitting the fabric. (2) If the highest part of the lever is on the button side of the fulcrum, then the pressure of the fabric may lift the pad very slightly, making the note into a partly-open drone.
To correct this, I merely opened the end again and examined where the levers touched. (If there is any difficulty about this, it is easy to rub a pencil lead along the tops of all the levers, add a piece of thin paper above them, and reassemble the end; when it is taken apart again, the graphite deposited on the paper will show which levers are being touched.) At those places--which in my instruments were between the lowest buttons and the palm rest--I used a pair of scissors edge-wise to trim the surface of the acoustical fabric in that small area. Very little trimming was necessary to provide the slight amount of room needed for the levers to close the pads securely, and it made no difference to the baffle effect achieved.
It is worth vacuuming an acoustical-fabric baffle after cutting it, to remove any loose threads. Loose threads can be later sucked into the reeds where they will produce the usual problems and need to be removed.
If sound is absorbed by a layer of acoustical fabric on the outside of the reeds, then it might be a good idea to put a layer on the other side as well, on the side of the reeds toward the bellows. There is a very easy way to do this. When you disassemble an end and lift out the reed-pan so as to look into the bellows, you see that in the corners of the bellows-frame are small blocks glued into the corners; these serve to reinforce the bellows-frame, and also their flat tops provide a set of uniform and level points on which the reed-pan is supported, so that its top edges are precisely leveled with the top edges of the bellows-frame, against which the flat side of the pad-board must fit perfectly. The reed-pan must fit entirely above these blocks--so the rest of the area at the same level as the blocks is empty, as is all the area toward and into the bellows. (Note that this area may be of different heights on different sides--if the concertina has an inclined reed-pan, it will protrude lower on one side.)
I used the same template, again, to cut an "inner-baffle" of acoustical fabric. On this side, one needs merely a hexagon (or octagon, or dodecagon) of fabric, with no need to cut out for buttons or sound-posts. I cut it, again, about 1/16" larger all around than the template. Again, the acoustically-active face should be towards the reeds, and the "top" should be marked so that the inner baffle can be reinserted repeatedly in the same orientation.
I trimmed the corners of the inner baffle so that it just fully cleared all the corner blocks, with not even a thread resting on a block to hold the reed-pan high. It then rested against the first fold of the bellows (when closed), with its edges under the edges of the reed-pan. Since it was a bit over-size, it sagged in the middle and I encouraged this by gently pushing down the middle (toward the center of the bellows). The sag was about 1/2" at the center.
On one concertina, after adding the inner baffle in this way some of the notes were out of tune. After further experiments, I concluded that the inner baffle had not sagged enough, so that its surface was just slightly interfering with the vibration of the inner reeds. I encouraged the sag a little bit further, by inserting the reed-pan and then poking my finger through the hole in its center to push the inner baffle away and toward the bellows. This provided just the slight additional clearance needed, and the reeds all returned to being in tune when the concertina was reassembled. On another concertina, there was less than usual space under the reedpan, so that the under-baffle interfered with the reeds quite a lot. On this instrument, I put a half-inch piece of double-sided tape on each of the six end-sections of the bellows, and then stuck the under-baffle to those pieces of tape. This held the under-bellows safely away from the lower reeds, except when the bellows was very nearly fully closed.
Adding the inner baffle provided a small but consistent measurable additional decrease in volume, half or less of the decrease provided by the outer "baffle lining" of the same fabric. This provides one more tool for adjusting the relative volumes of the two ends.
I have tried using TWO thicknesses of acoustical fabric, all by themselves, both inside the end and below the reed-pan. Two thicknesses of the fabric total 9mm, compared to 7mm for the standard combination, but I have never made the 9mm work, even in a large raised-end instrument. In the end of the concertina, the two thicknesses prevent the pads from opening sufficiently; below the reed-pan, two thicknesses interfere with the reeds. I've never made this work yet, so I don't know what effect it would have.
With the inner layer of acoustical fabric installed inside the reed-pan, and the reed-pan reinstalled, all that is left is to fit the acoustical fabric "baffle lining" inside the leather baffle already held by double-sided tape, which can ordinarily be done by just pushing the slightly-oversized fabric into the end. Then the action-box is reassembled, and mounted to the bellows frame with the end-bolts.


13. How I Measure Results
After many different experiments, I tested the effect of the techniques described above more carefully by applying all of the procedures to three different concertinas which had not been worked on previously.
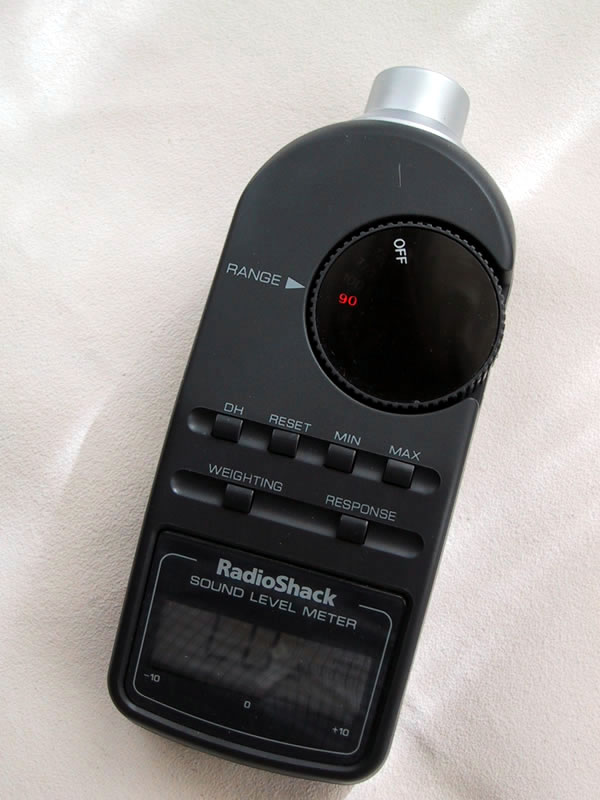
I measured the sound level of each end of the instruments, using a Radio Shack "Digital Sound Level Meter". This is a meter which has been sold for many years by Radio Shack, current price USD 59.95 (GBP 42.22, EUR 68.12). Full details below under Suppliers. It is apparently often used by audiophiles setting up listening environments, in conjunction with CDs that contain standard tones and levels. Its advantage is that it is easy to get and very inexpensive, and different units give very uniform results so the measurements taken by different people using the same meter can be compared (and they are frequently reported to audiophile newsgroups on the internet). Its disadvantage is that it measures only the total sound level, and does not offer the ability to measure the different sound levels of particular octaves (or thirds of octaves), so it cannot be used to help understand how the character of the sound is changed. But what it does, it does reliably; it measures sound level, in decibels (dB), and can use "A" weighting for direct readings in dBA. In fact, I bought two of these meters and tried both of them. They were easy to use, extremely consistent in making repeatable meaurements, and the two meters agreed very closely.
My testing setup was a small room (8 ft by 10 ft), floors partly hard and partly carpeted, walls partly hard and partly curtained, all doors and windows closed. The sound level meter was positioned on marks on a tabletop, pointing outward. The concertina was held vertically in a fixed spot about one foot away beside the table, with the top end (being measured) in the focus of the sound level meter. The desired buttons were depressed, and then the support for the bottom end of the concertina was released allowing it to fall by gravity. This means that the sound was not nearly as loud as if the bellows had been pulled more energetically, but it was repeatable; also, the same set of reeds was measured each time. The sound level meter was adjusted to "A" weighting, to a rapid response, and set to record and hold the maximum level experienced during the time after the free end of the concertina was released.
For the first concertina, for every measurement, the concertina was tested 12 times. When the left end was being measured, it was tested 6 times playing a 3-note C chord, 6 times playing a 3-note G chord, and the 12 measurements averaged and rounded to the nearest whole-number reading in dBA. When the right end was being measured, it was tested 6 times playing a single C, 6 times playing a single G, and the 12 measurements averaged and rounded in the same way. (Note carefully the economical terminology I'm using below: whenever a "left-end" measurement is given it is for a three-note chord, and whenever a "right-end" measurement is given it is for a single note; so the two ends are said to be "the same volume" when a three-note chord on the left yields the same numerical measurement as a single note on the right. This is not the ordinary meaning of "the same volume".)
Making twelve sets of measurements in this way appeared to be an excess of zeal; the measurements were always clustered closely, with an occasional outlier. So on the next two instruments I tried each measurement three or four times only, accepting the obvious value and making more measurements if there seemed to be any variation.
I'm no expert about acoustic measurements, but elementary books tell me that most sounds are between 30 dBA and 120 dBA measured from three feet; quiet whispering at three feet measures about 30 dBA, a chainsaw at three feet measures about 117 dBA. (All concertina measurements were taken at one foot.) In "dBA", the "dB" part stands for "decibels", the unit of measurement; the "A" stands for "A-weighted", meaning that the loudness of different pitches is given more or less weight, reflecting the way human ears perceive sound over the audible frequency range. This weighting has been found to correspond most closely to subjective noisiness.
The dBA measurements are logarithmic, so they cannot be combined or compared in the usual arithmetic way. For combining loudnesses, one rule is that combining two sounds of the same loudness adds +3 dBA; so if you have one reed sounding at 90 dBA and a second reed at 90 dBA, the loudness of both together is not "180" but is 93 dBA. Combining three sounds of the same loudness adds about +5 dBA (not 6 dBA). So for three reeds each measured at 90 dBA, the total sound level would be 95 dBA; and for three reeds each measured at 80 dBA, the total sound level would be 85 dBA.
In comparisons, a difference of 1 dBA is generally unnoticeable. A difference in sound level of 2 or 3 dBA is said to be "just noticeable". A difference of somewhere around 10 dBA is perceived to be "about twice as loud". Because human ears are not linear, the perception of "about four times as loud" is usually found at less than the 20 dBA difference that this rule would predict, actually closer to 15 dBA.
The idea that a difference of around 10 dBA is "about twice as loud" has given rise to a rule of thumb that for one sound to be "clearly audible" over other sounds, it should be about 5 dBA louder. Applied to my own personal goals in adding baffles to a Maccann Duet, this suggests that I would like to alter the sound produced so that the right hand (single note) is roughly 5 dBA louder than the left hand (three-note chord). Whether the right hand is "clearly audible" over left-hand chords clearly depends on more than the relative sound levels--the right-hand melody is easier to hear if its notes are distinctly higher than the notes in the chords, harder to hear if the chords and the melody are played in the range where the two sides overlap, for example.
If you assume that on an ideal concertina each and every note has exactly the same loudness, then playing three notes in a chord on the left would be about +5 dBA louder (just by combining the three notes) than a single note played on the right. This is, in fact, close to what is frequently measured in real concertinas. So the task at hand is to reduce the loudness of the left side reeds enough so that combining three of them still leaves them about 5 dBA quieter than a single reed on the right side, instead of about 5 dBA louder.
As a numerical example, assume that every reed--left and right--individually produces a sound measured as 90 dBA. Then three reeds on the left will measure 95 dBA together and one reed on the right will measure 90 dBA (about 5 dBA quieter). We need to reduce the loudness of each reed on the left side to about 80 dBA, a reduction of 10 dBA ("about half as loud"). Then the three reeds on the left will measure about 85 dBA together and one reed on the right will still measure the original 90 dBA (about 5 dBA louder). This would accomplish the particular change that I am seeking, to make the right-hand melody "clearly audible" over the chords, rather than the other way around.
(A) Wheatstone #27217
|
The first set of measurements was done on Wheatstone #27217 , a Wheatstone model 33 manufactured 26 August 1916, a 46-key Maccann Duet with nickel plated ends with black wood, metal buttons, and six-fold bellows. Inside it is marked "Repaired 1991" by C. & R. Dipper, and I purchased it from from Chris Algar. Just to listen to it, this seems to be a suitably-representative metal-ended Wheatstone--very loud, and with a very loud left hand side.
To begin with I measured the sound unaltered, as the concertina came from the factory (or at least from its latest refurbishment):
| Left | Right | Diff (L-R) | |
| Wheatstone #27217, Factory | 97 dBA [-00 dBA] | 93 dBA [-00 dBA] | +04 dBA |
This means that, measured as described above, a three-note chord on the left end was recorded at 97 dBA (changed by 00 dBA because no alteration has been made yet), a single melody note on the right end was measured at 93 dBA, so the difference (always calculated as "left minus right", but the result may be positive or negative) is +04 dBA louder on the left side.
My measurements indicate that on this concertina adding an inner layer of sound-absorbing acoustical fabric just on the bellows-side of the reeds reduced the sound by about -02 dBA. Adding a layer on the outside, the end-side, reduced the sound level by -05 dBA. Doing both results in a -06 dBA reduction, and hence also a 6 dBA change in the "left-minus-right" difference, from +04 dBA to -02 dBA.
| (Installed on Left Side) | Left | Right | Diff (L-R) |
| Bellows-side fabric | 95 dBA [-02 dBA] | 93 dBA [-00 dBA] | +02 dBA |
| End-side fabric | 92 dBA [-05 dBA] | 93 dBA | -01 dBA |
| Bellows-side and end-side fabric | 91 dBA [-06 dBA] | 93 dBA | -02 dBA |
Next I took the acoustical fabric out, and installed just a leather baffle, cut close. That reduced the sound by -05 dBA. To my surprise, re-installing the acoustical fabric again had exactly the same effect as before, in addition to the effect of the leather. So with all the possibilities in place--leather baffle, plus layers of acoustical fabric on each side of the reeds, the total reduction was -11 dBA. This made the total difference between the two sides -07 dBA, so the right side melody was clearly audible over chords played on the left side.
| (Installed on Left Side) | Left | Right | Diff (L-R) |
| Leather (close), 1/16" foam tape | 92 dBA [-05 dBA] | 93 dBA [-00 dBA] | -01 dBA |
| Leather and Bellows-side fabric | 90 dBA [-07 dBA] | 93 dBA | -03 dBA |
| Leather and End-side fabric | 87 dBA [-10 dBA] | 93 dBA | -06 dBA |
| Leather and both-side fabric | 86 dBA [-11 dBA] | 93 dBA | -07 dBA |
This is what was wanted: the left side has been quieted by -11 dBA (which is definitely cutting its loudness in half), leaving the right side very clearly audible over the left.
But there are two reasons for wanting to go further and to install a leather baffle on the right side as well. First, it would be nice to have some of the "sweetening" effect on the right side as well. Second, for cosmetic reasons it looks nice to have what are apparently the same kind of baffles on both sides.
I started by installing the same kind of leather baffle on the right:
| (Installed on Left Side) |
| Leather (close) and Bellows-side and End-side fabric |
| (Installed on Right Side) | Left | Right | Diff (L-R) |
| Leather (close), 1/16" foam tape | 86 dBA [-11 dBA] | 88 dBA [-05 dBA] | -02 dBA |
So, when I fitted a full-sized leather baffle on the right side, I produced the predicted effect of quieting it by -05 dBA--the same reduction as on the left side. This is more than I wanted (because it left the two ends about the same in volume), so I removed the right-hand leather baffle and trimmed it to be about 1/16" from all six sides. Then it was reinstalled, with the result:
| (Installed on Left Side) |
| Leather (close) and Bellows-side and End-side fabric |
| (Installed on Right Side) | Left | Right | Diff (L-R) |
| Leather (gap), 1/16" foam tape | 86 dBA [-11 dBA] | 91 dBA [-02 dBA] | -05 dBA |
This seems to be about right. Changing the right-hand leather baffle to have a somewhat larger slit around its edge reduces the sound level of the right side by only -02 dBA, a hardly-noticeable amount. With all baffles, a single melody note on the right side is now about +05 dBA louder than a three-note chord on the left hand, and clearly audible.
(B) Wheatstone #29195
|
I then repeated the measurement process on a second instrument, Wheatstone #29195, a Wheatstone model 35A manufactured 15 June 1922, a 57-key Maccann Duet with nickel plated ends with dark wood, metal buttons, and seven-fold bellows, purchased from Chris Algar. This is again representative of metal-ended Wheatstones--even slightly louder, and again with a very loud left hand side.
I measured the sound unaltered, as the concertina came from the factory:
| Left | Right | Diff (L-R) | |
| Wheatstone #29195, Factory | 99 dBA [-00 dBA] | 94 dBA [-00 dBA] | +05 dBA |
This is a very typical result, with the left side about +05 dBA over the right side--the opposite of what is desired. I installed baffles as before, trying harder to make the left-hand baffle as close-fitting as possible. This time (at a second try, actually) I got about twice the reduction from the leather alone, presumably because the baffle fits more closely:
| (Installed on Left Side) | Left | Right | Diff (L-R) |
| Bellows-side fabric | 98 dBA [-01 dBA] | 94 dBA [-00 dBA] | +04 dBA |
| End-side fabric | 95 dBA [-04 dBA] | 94 dBA | +01 dBA |
| Bellows-side and End-side fabric | 94 dBA [-05 dBA] | 94 dBA | -00 dBA |
| Leather (close), 1/16" foam tape | 88 dBA [-11 dBA] | 94 dBA | -06 dBA |
| Leather and Bellows-side fabric | 88 dBA [-11 dBA] | 94 dBA | -06 dBA |
| Leather and End-side fabric | 84 dBA [-15 dBA] | 94 dBA | -10 dBA |
| Leather and both-side fabric | 84 dBA [-15 dBA] | 94 dBA | -10 dBA |
I then installed a standard-cut baffle on the right-hand side, with the expected effect. This produced an instrument significantly quieter overall, as well as being balanced in the way I wanted it:
| (Installed on Left Side) |
| Leather (close) and Bellows-side and End-side fabric |
| (Installed on Right Side) | Left | Right | Diff (L-R) |
| Leather (close), 1/16" foam tape | 84 dBA [-15 dBA] | 89 dBA [-05 dBA] | -05 dBA |
(C) Lachenal #1746
|
Finally, I installed baffles on the same principle in an old Lachenal, #1746 (possibly before 1900?), a 46-key Maccann Duet with nickel plated ends with dark wood, bone buttons (unbushed), and six-fold bellows with bellows papers, purchased from Chris Algar.
This instrument is considerably different from the others: it does not appear to have been an expensive instrument, but on the other hand it has the best tone (unbaffled) of any instrument I've ever owned. Examined carefully, the remaining Lachenal label can be seen to be mounted on a cloth backing which must be the remains of an original linen lining from which the label has been cut. Curiously, in its unbaffled state, this is the only instrument I've ever played in which the right hand was naturally louder than the left--it was the original inspiration which led me to try to use baffles to make other instruments more like this one, so I could play them! Also, its tone changes the most when baffles are added, becoming "sweeter" and smoother to an exceptional degree. The reeds are undoubtedly steel, and I haven't noticed anything obviously unusual about its reeds, reed-frames, or reed-chambers, so I cannot explain why it sounds so good.
I measured the sound unaltered, as the concertina came from the factory, finding that a single note on the right side was, indeed, just about "clearly audible" over a three-note chord on the left side (the negative difference of "-04 dBA" means that the right side is louder):
| Left | Right | Diff (L-R) | |
| Lachenal #1746, Factory | 94 dBA [-00 dBA] | 98 dBA [-00 dBA] | -04 dBA |
I installed baffles as before, making the leather baffle on the left just ordinarily close-fitting so as not to reduce the sound too much:
| (Installed on Left Side) | Left | Right | Diff (L-R) |
| Bellows-side fabric | 93 dBA [-01 dBA] | 98 dBA [-00 dBA] | -05 dBA |
| End-side fabric | 89 dBA [-05 dBA] | 98 dBA | -09 dBA |
| Bellows-side and End-side fabric | 88 dBA [-06 dBA] | 98 dBA | -10 dBA |
| Leather(close), 1/16" foam tape | 88 dBA [-06 dBA] | 98 dBA | -10 dBA |
| Leather and Bellows-side fabric | 88 dBA [-06 dBA] | 98 dBA | -10 dBA |
| Leather and End-side fabric | 84 dBA [-10 dBA] | 98 dBA | -14 dBA |
| Leather and both-side fabric | 84 dBA [-10 dBA] | 98 dBA | -14 dBA |
I then installed a second standard-cut leather baffle on the right-hand side, with the expected effect. This produced an instrument somewhat quieter overall, as well as being balanced. The right hand was left significantly louder than the left, so the end result is an instrument that has become quieter than it was originally, with a somewhat more pronounced right side:
| (Installed on Left Side) |
| Leather (close) and Bellows-side and End-side fabric |
| (Installed on Right Side) | Left | Right | Diff (L-R) |
| Leather (close), 1/16" tape | 84 dBA [-10 dBA] | 92 dBA [-06 dBA] | -08 dBA |
14. Summary
What I did, typically, was to
- (i) add a close-fitting leather baffle to the left side;
- (ii) add a baffle-lining of acoustical fabric inside the leather, and
- (iii) add an inner baffle of fabric inside the reed-pan on the left side; then
- (iv) add a loose-fitting leather baffle to the right side.
The result is that the volume of the left side is reduced to half or less of its original level. The volume of the right side is reduced by a smaller amount to change the balance of the two ends.
In the first two cases measured, as shipped from the factory the right side (a single melody note) was about 5 dBA quieter than the left side (a three-note chord), so it couldn't be heard; afterward, a single note on the right side is actually about 5 dBA louder than a chord on the left, which leaves the melody "clearly audible" over the chords. The two sides look alike, and the tone is modified in a similar "sweeter" way on both sides. The result is an instrument with a balance that I can play with a great deal more satisfaction.
My concertinas themselves are left unmodified, and all trace of the baffles can be removed in a few minutes leaving no damage. The total cost for the materials (a goatskin, a roll of double-sided tape, and a linear yard of acoustical fabric), is about USD 120 (GBP 85, EUR 135) which is enough to provide baffles for at least two large concertinas, or four smaller concertinas. A sound level meter for an additional USD 60 (GBP 42, EUR 68) is highly recommended to provide unambiguous feedback.
Have feedback on this article? Send it to the author.
Reprinted from the Concertina Library
http://www.concertina.com
© Copyright 2000– by Robert Gaskins
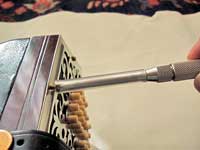
helps to avoid marring endbolts
(a tip from Steve
Dickinson, Wheatstone & Co.)
Contents
- Baffles for Maccann Duet Concertinas:
- Section I:
Introduction - 1. Introduction
- 2. Motivation: Why I Fit Baffles
- 3. Original Baffles on Vintage Concertinas
- 4. Playing Without Baffles
- 5. Traditional Leather on Standoffs, Plus Modern Acoustical Materials
- 6. Choice of Leather
- 7. Choice of Mounting Tape
- 8. Sound-Absorbing Acoustical Fabric
- Section II:
Step-by-Step Photographs - 9. Nomenclature and Disassembly
- 10. How I Make Templates
- 11. How I Cut and Fit Leather Baffles
- 12. How I Cut and Fit Acoustical-Fabric Baffles
- 13. How I Measure Results
- 14. Summary
Send this page to a friend.
This page was last changed | |
|
© Copyright 2000– by Robert Gaskins |